はじめに
現在、方言を話すおしゃべり猫型ロボット「ミーア」を開発中。

以前、天気情報を読み取ってユーザーが設定した時刻になると今日の天気を音声で教えてくれるプログラムを開発した。
ご協力いただいているデザイナーの方にこの機能について伝えたところ
「Appleヘルスアプリなどに行動データを貯めているのですが、そのデータを元にフィードバックしてくれる機能があったら良いなと前から思っていました」
とのことで、確かに、そうだ!と思い、実装を試みることにした。
HealthKitとは
iPhone・AppleWatchを経由して健康データ(心拍数や睡眠に関するデータ等)、フィットネスデータ(ランニングやウォーキング、サイクリング等)の収集と保存 、データを使ったソーシャルインタラクションのを提供するフレームワーク。


HealthKit のセットアップ
HealthKit を使用する前に、アプリの HealthKit 機能を有効にする必要がある。Xcode でプロジェクトを選択し、HealthKit 機能を追加する。
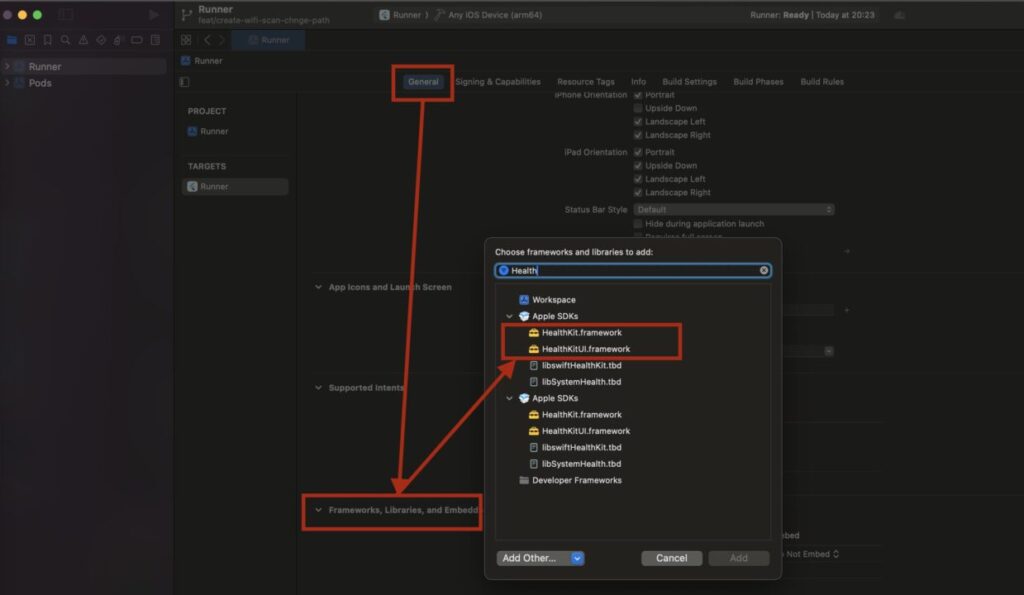
Generalの「Frameworks, Libraries, and Embedded Content」にHealthKitとHealthKitUIフレームワークを追加する。

Signing & CapabilitiesにHealthKitを追加する。
Signing & Capabilities > +Capability(場所分かりにくい) > 検索バーがポップアップで表示されるのでHealthKitを検索して追加。
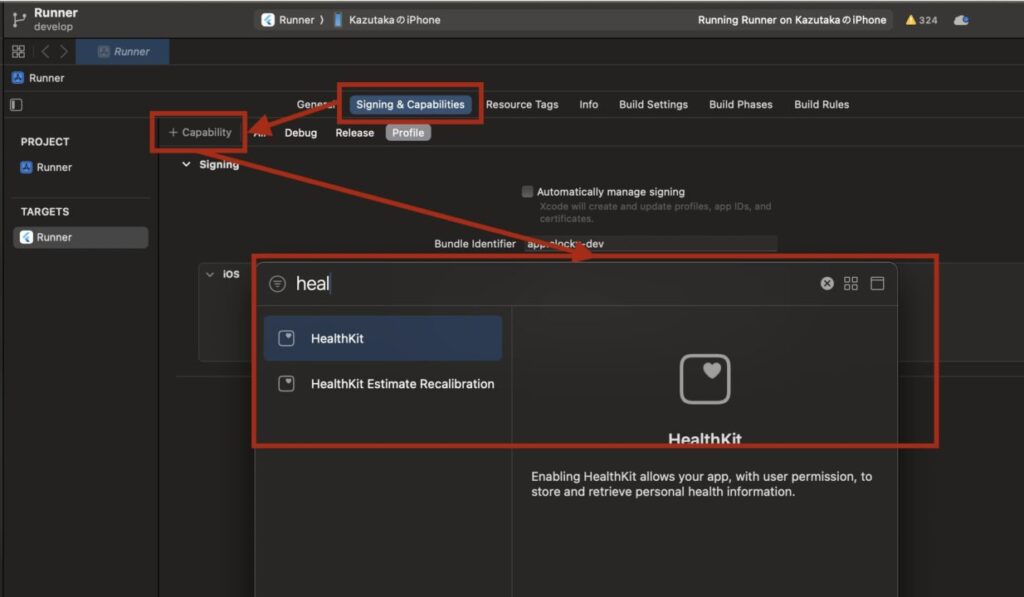
すると、HealthKitのSectionが追加される。Capabilitiesに下記2項目のチェック欄が表示される。

- Clinical Health Records:アプリがユーザーの臨床記録にアクセスする必要がある場合のみ選択する(今回は使用しない)。
- Background Delivery:アプリがバックグラウンドで実行されている間にも、特定の健康データが更新されたときにアプリに通知する
Background Deliveryは、リアルタイムでのデータ監視や即時反応が必要な場合に最も役立つ。例えば、歩数や心拍数などのデータに基づいてユーザーに即時のフィードバック(今日の歩数が1万歩超えました!おめでとうございます!というメッセージを送るなど)を提供したい場合など。
今回のネコ型おしゃべりロボットでは、ユーザーがアプリで設定した特定の時間に前日までの行動データを元に音声を再生する予定なので、リアルタイムでのデータ更新を必要としないので、Background Deliveryを有効にしない。
HealthKitからのデータ取得は、ユーザーがHealthアプリを開いているかどうかに関係なく行われる。アプリケーションにHealthKitデータへのアクセス権が付与されていれば、バックグラウンドまたはフォアグラウンドでの実行中に関わらず、必要なデータを取得できる。したがって、ユーザーが設定した時間になった時点でHealthKitからデータを取得し、音声フィードバックを提供することは可能。
Flutter:healthパッケージを使う
アプリはFlutterで開発しているので、flutterのパッケージでhealth kit apiとの連携に対応しているものを探す。下記ではhealthというパッケージが一番人気そう。

healthパッケージを見てみる。
iOSにもGoogle Fitにも対応しており、4日前にも更新されているので、アップデート状況も良い。今回はこのパッケージを使うことにする。

healthパッケージを追加
flutter pub add healthpubspec.yamlに下記のように追加されるので、flutter pub getする。
dependencies:
  health: ^9.0.1
iOSアプリのInfo.plistに、必要なキーと説明文を追加
先ほどのhealthパッケージのSetup項目に下記のように記載されている。
Step 1: Append the Info.plist with the following 2 entries
<key>NSHealthShareUsageDescription</key>
<string>We will sync your data with the Apple Health app to give you better insights</string>
<key>NSHealthUpdateUsageDescription</key>
<string>We will sync your data with the Apple Health app to give you better insights</string>Flutterプロジェクト内でiOSアプリケーションの設定を行うInfo.plistファイルは、下記。
<Flutterプロジェクトのルート>/ios/Runner/Info.plist上記のディレクトリに移動し、Info.plistファイルを開いて、指示された2つのキーとその説明文をファイルに追加。これにより、アプリがApple Healthのデータを読み取る際、または更新する際に、ユーザーに適切な許可を求めることができる。
iOS minimum deployment targetを13.0に変更
flutter runでビルドしようとしたら下記エラーに遭遇
[!] CocoaPods could not find compatible versions for pod "health":
  In Podfile:
    health (from `.symlinks/plugins/health/ios`)

Specs satisfying the `health (from `.symlinks/plugins/health/ios`)` dependency were found, but they required a higher minimum deployment target.
healthパッケージやGitHubのReadmeには、iosのminimum deployment targetが記載されていなかったが、下記の記事で、このように記載されていた。
Ensure that your minimum deployment target (
platform :ios, '13.0') and any subsequent versions are appropriately set inside theios/Podfilefolder.
Runnerプロジェクト→Runnerターゲット→Generaタブ→Minimum Deploymentsを13.0に変更(11.0になっていた)

flutterのios→Podfile内の、platform :ios, ‘12.0’の部分も、platform :ios, ‘13.0’に変更。
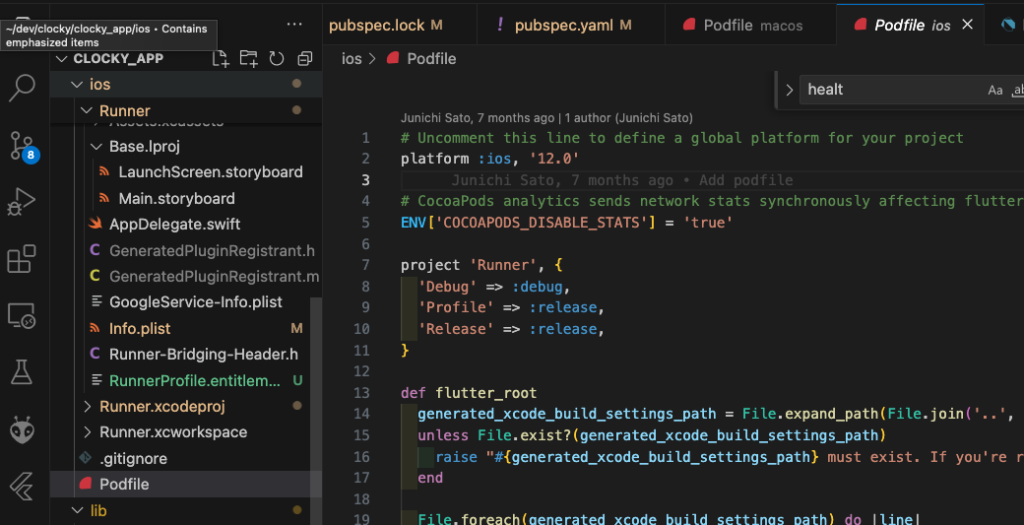
iosディレクトリで、pod installを実行。
エラーなくなり、Xcodeから直接Runすると起動できたが、flutter runの場合には、下記エラーが発生。
Flutterアプリをデバイスにビルドしようとしたときに、特定のファイルへのアクセスがサンドボックスによって拒否されたと書かれている。
他のシステムからプロジェクトをオーバーライドする際に、依存関係におけるキャッシュとバージョンの不一致が原因で発生している。
Launching lib/main.dart on iPhone 14 in debug mode...
Running Xcode build...
Xcode build done.                                           92.3s
Failed to build iOS app
Error (Xcode): Sandbox: rsync.samba(73267) deny(1) file-write-create /Users/ky/dev/clocky/clocky_app/build/ios/Debug-iphonesimulator/Flutter.framework


Error (Xcode): Flutter failed to write to a file at "/Users/ky/dev/clocky/clocky_app/build/ios/Debug-iphonesimulator/.last_build_id".


Could not build the application for the simulator.
Error launching application on iPhone 14.
XcodeプロジェクトのビルドオプションENABLE_USER_SCRIPT_SANDBOXINGを’No’に更新する。

無事シミュレーターではビルドできたが、引き続き、実機でflutter runしようとするとビルドできなかった。こちらに関しては、XCodeを入れ直したり、flutter cleanするなど色々と試行錯誤したり、issueで上がっていないか見たりして結構大変だった。
自分の場合は、flutter upgrade(Flutter 3.10.6→3.19.0)したら、実機ビルドできるようになった。

アプリでのApple Health Kit連携実装
ようやく環境設定できたので、いよいよ実装に入りたい
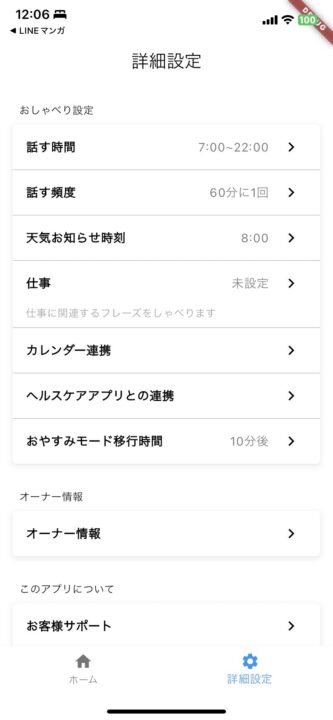
下記の詳細設定画面に、「ヘルスケアアプリとの連携」という項目を追加し、クリックした遷移先の画面で「Appleヘルスケアとの連携」ボタンを表示。
連携するボタンをクリックすると、Apple Health KitのAPIを呼び出して、データアクセスの許可をユーザーに求める画面を表示する。

詳細設定画面に、ヘルスケアアプリとの連携」の項目をリストに追加し、タップしたときのナビゲーションを実装する。
// lib/screens/home/settings_tab.dart

body: ListView(
  padding: const EdgeInsets.all(16.0),
  children: <Widget>[
    sectionHeader('おしゃべり設定'),
    buildSection(
        ['話す時間', '話す頻度', '天気お知らせ時刻', '仕事', 'カレンダー連携', 'ヘルスケアアプリとの連携', 'おやすみモード移行時間']),
    sectionHeader('オーナー情報'),
    buildSection(['オーナー情報']),
    sectionHeader('このアプリについて'),
    buildSection(['お客様サポート', 'ご利用規約']),
  ],
),

// ...

onTap: () async {
  switch (item) {
    // ... 他のケースはそのまま
    case 'ヘルスケアアプリとの連携':
      await Navigator.push(
        context,
        MaterialPageRoute(
          builder: (context) => const HealthCareAppIntegrationScreen(), // この画面はまだ作成していません
        ),
      );
      break;
    // ...
  }
},
次に、遷移先の画面ファイルを作成。
// lib/screens/home/health_care_app_integration_screen.dart
import 'package:flutter/material.dart';
import 'package:health/health.dart';

class HealthCareAppIntegrationScreen extends StatefulWidget {
  const HealthCareAppIntegrationScreen({Key? key}) : super(key: key);

  @override
  _HealthCareAppIntegrationScreenState createState() =>
      _HealthCareAppIntegrationScreenState();
}

class _HealthCareAppIntegrationScreenState
    extends State<HealthCareAppIntegrationScreen> {
  // ここで連携したいデータタイプを定義
  static final types = [HealthDataType.STEPS];
  // READ only
  final permissions = types.map((e) => HealthDataAccess.READ).toList();

  // create a HealthFactory for use in the app
  HealthFactory health = HealthFactory(useHealthConnectIfAvailable: true);

  Future<void> requestPermissions() async {
    bool requestResult =
        await health.requestAuthorization(types, permissions: permissions);
    // 許可の結果に基づいて何かをする
    if (requestResult) {
      // ユーザーが許可した場合の処理
      print("Authorization granted");
    } else {
      // ユーザーが許可しなかった場合の処理
      print("Authorization denied");
    }
  }

  @override
  Widget build(BuildContext context) {
    return Scaffold(
      appBar: AppBar(
        title: const Text('ヘルスケアアプリとの連携'),
      ),
      body: Center(
        child: ElevatedButton(
          onPressed: () => requestPermissions(),
          child: const Text('連携する'),
        ),
      ),
    );
  }
}
シンプルに、連携するボタンのみが表示されていて、ボタンを押したら、ヘルスアプリへの連携許可画面が出るのみのもの。

実行したところ、下記エラーが出た。
flutter: >> trying to get permissions for [STEPS] with permissions [0]
flutter: >> isAuthorized: false
flutter: Authorization denied
XCodeの方のログも見ると、下記のエラー。
flutter: >> trying to get permissions for [STEPS] with permissions [0]
FAILED prompting authorization request to share (
), read (
    HKQuantityTypeIdentifierStepCount
)iOSのInfo.plist設定が正しく反映されていないことが原因なのかと思い、XCodeのGUIでもinfo.plistを確認したが、NSHealthShareUsageDescriptionとNSHealthUpdateUsageDescriptionのキーが適切に設定されていた。

他にも下記エラーがXCodeに表示されていた
connection error: Error Domain=com.apple.healthkit Code=4 "Missing com.apple.developer.healthkit entitlement." UserInfo={NSLocalizedDescription=Missing com.apple.developer.healthkit entitlement.}アプリがHealthKitにアクセスするための必要な権限(entitlement)が設定されていないことを示している。HealthKitを使用するには、アプリのentitlementsにcom.apple.developer.healthkitを追加し、アプリIDでHealthKitを有効にする必要がある。
ios/Runner/RunnerProfile.entitlementsを開いて確認したところ、すでに、HealthKitへのアクセスを許可するためのentitlementが正しく設定されているのだが謎。
// ios/Runner/RunnerProfile.entitlements
<?xml version="1.0" encoding="UTF-8"?>
<!DOCTYPE plist PUBLIC "-//Apple//DTD PLIST 1.0//EN" "http://www.apple.com/DTDs/PropertyList-1.0.dtd">
<plist version="1.0">
<dict>
	<key>com.apple.developer.healthkit</key>
	<true/>
	<key>com.apple.developer.healthkit.access</key>
	<array/>
</dict>
</plist>
RunnerProfile.entitlementsだけでなく、Runner.entitlementsにも設定を与える必要があった。
// ios/Runner/Runner.entitlements
<?xml version="1.0" encoding="UTF-8"?>
<!DOCTYPE plist PUBLIC "-//Apple//DTD PLIST 1.0//EN" "http://www.apple.com/DTDs/PropertyList-1.0.dtd">
<plist version="1.0">
<dict>
	<key>com.apple.developer.healthkit</key>
	<true/>
	<key>com.apple.developer.healthkit.access</key>
	<array/>
</dict>
</plist>
再びBuild。今度は、無事ヘルスケアデータのアクセス画面が表示された。

flutter: >> trying to get permissions for [STEPS] with permissions [0]許可したら、下記のように許可完了のログが出力された。

flutter: >> isAuthorized: true
flutter: Authorization granted
おわりに
Apple Health Kit連携の認証周りで詰まるところがいくつかあったが、無事ヘルスデータアクセス処理まではできた。
次は、取得したデータをバックエンドに連携する部分を実装する。



コメント