はじめに
様々な方言を話す。おしゃべりに小型ロボット「ミーア」を開発中。
現在、「カレンダー連携で予定を音声通知する機能」を開発中で、前回はFlutterアプリからGoogleサインインを利用し、Googleカレンダーの認証を行い、ユーザーのカレンダー情報を取得するところまでを記載した。
この時は、アプリでgoogleカレンダーの認証後にアクセストークンを取得してアクセストークンをもとにgoogleカレンダーの予定表示を行っていた。
ただ、今回は、Google Calendar APIへのアクセスをより安全かつ効率的に管理するために、アプリ側でアクセストークンを直接使用せず、認証コード(Auth Code)をバックエンドに送信してリフレッシュトークンを生成・保存し、そのリフレッシュトークンを使用してGoogle Calendar APIにアクセスする仕組みに変更することにした。
本記事では、以下のポイントについて記載
- Flutterアプリ側:認証コードとユーザーIDをバックエンドに送信する仕組み。
- バックエンド(Go言語):認証コードをリフレッシュトークンに変換し、データベースに保存するロジック。
- 全体のフロー:Google OAuth 2.0フローに基づく処理の流れと実装の工夫。
システム全体の概要
Flutterアプリ側
- Googleサインインで認証コード(Auth Code)を取得。
- 認証コードとユーザーIDをバックエンドに送信。
バックエンド
- 認証コードをGoogleのトークンエンドポイントに送信し、認証コードからリフレッシュトークンを取得。
- 取得したリフレッシュトークンをデータベースに保存。
- 保存されたリフレッシュトークンを使ってGoogle Calendar APIにアクセス。
トークンの保存と管理における課題
GoogleカレンダーAPIを利用する際、アクセストークンは有効期限が1時間と短く、定期的に新しいトークンを発行する必要がある。このため、長期的な認証を維持するには、リフレッシュトークンを保存し、これを用いてアクセストークンを再生成する仕組みが必要。
しかし、リフレッシュトークンには以下の課題がある。
セキュリティリスク
- リフレッシュトークンが流出すると、攻撃者がユーザーのGoogleカレンダー情報にアクセスできる可能性がある。
- 必要な権限以上に多くのサービスがトークンにアクセスできるのは望ましくない。
データベース設計の柔軟性
- トークンを
usersテーブルに直接保存すると、アクセス権限を細かく管理するのが難しくなる。
専用テーブルによるリフレッシュトークンの分離
これらの課題を解決するために、リフレッシュトークンを専用のテーブルに分離して保存することにする。
専用テーブルを作成
- リフレッシュトークンは
google_calendar_tokensテーブルに保存し、usersテーブルとは外部キーで紐付ける。
暗号化して保存
- リフレッシュトークンはデータベースに保存する前に暗号化し、復号化は必要な時だけ行う。
アクセス制御
- トークン用のテーブルに対するアクセス権限を、バックエンドの一部のモジュールやサービスアカウントに限定する。
google_calendar_tokensテーブルの設計例
| カラム名 | データ型 | 説明 |
| id | UUID/BigInt | トークンの一意な識別子 |
| user_id | UUID/BigInt | ユーザーID(usersテーブルの外部キー) |
| refresh_token | TEXT | 暗号化されたリフレッシュトークン |
| created_at | TIMESTAMP | レコード作成日時 |
| updated_at | TIMESTAMP | レコード更新日時 |
Flutterアプリの実装
Flutterアプリでは、Googleサインインを使用して認証コードを取得し、バックエンドに送信する。以下は、主要な実装例。
CalendarIntegrationScreen:Googleカレンダー連携画面
Googleカレンダー連携画面を構成し、ユーザーがボタンを押すことでGoogleサインインを実行し、認証コードを取得する処理を提供。
serverClientId を指定すると、サインイン後にバックエンドに送信可能な認証コード(serverAuthCode)が返される。
serverClientId を指定せずにclientIdのみを指定した場合、サインイン後、アクセストークン が直接アプリ側に返される。アクセストークンは短時間(通常1時間)しか有効でないため、アプリ側でトークンの有効期限を管理し、期限切れの際に再度サインインを行う必要がある。
今回は、バックエンド側にリフレッシュトークンを保存したいので、そのためには認証コードの取得が必要なのでserverClientId を指定する。
lib/screens/home/calendar_integration_screen.dart
import 'package:clocky_app/api/api_client_provider.dart';
import 'package:clocky_app/api/user_notifier.dart';
import 'package:clocky_app/firebase_options.dart';
import 'package:clocky_app/services/google_calendar_auth_service.dart';
import 'package:flutter/material.dart';
import 'package:flutter_riverpod/flutter_riverpod.dart';
import 'package:google_sign_in/google_sign_in.dart';

class CalendarIntegrationScreen extends ConsumerWidget {
  const CalendarIntegrationScreen({super.key});

  @override
  Widget build(BuildContext context, WidgetRef ref) {
    return Scaffold(
      appBar: AppBar(
        title: const Text('カレンダー連携'),
      ),
      body: Center(
        child: ElevatedButton(
          onPressed: () async {
            await _fetchTodayEvents(context, ref);
          },
          child: const Text('Googleカレンダーと連携する'),
        ),
      ),
    );
  }

  Future<void> _fetchTodayEvents(BuildContext context, WidgetRef ref) async {
    try {
      // UserNotifier からユーザー情報を取得
      final user = ref.watch(userProvider);
      if (user == null) {
        throw Exception('ユーザー情報がロードされていません');
      }

      final internalUserId = user.id;
      if (internalUserId == null) {
        throw Exception('内部ユーザーIDが存在しません');
      }
      debugPrint('取得した内部ユーザーID: $internalUserId');

      // Google Sign-Inの初期化
      final GoogleSignIn googleSignIn = GoogleSignIn(
        scopes: [
          'https://www.googleapis.com/auth/calendar.readonly',
          'https://www.googleapis.com/auth/calendar',
        ],
        clientId: DefaultFirebaseOptions.ios.iosClientId,
        serverClientId:
            'XXXXXX.apps.googleusercontent.com', // WebクライアントID
      );

      // Googleサインインを実行
      final account = await googleSignIn.signIn();
      if (account == null) {
        debugPrint('Googleサインインがキャンセルされました');
        return;
      }

      // 認証コードの取得
      final authCode = account.serverAuthCode;
      if (authCode == null) {
        throw Exception('認証コードが取得できませんでした');
      }
      debugPrint('取得した認証コード: $authCode');

      // サーバーに認証コードを送信してリフレッシュトークンを取得・保存
      final googleCalendarService =
          GoogleCalendarService(apiClient: ref.read(apiClientProvider));
      await googleCalendarService.sendAuthCode(
          internalUserId.toString(), authCode);
      debugPrint('リフレッシュトークンの取得に成功しました');
    } catch (e) {
      debugPrint('エラーが発生しました: $e');
    }
  }
}
GoogleCalendarService: Google Calendar関連の処理を担当するサービスクラス
lib/services/google_calendar_auth_service.dart
- アプリ内で認証コードをバックエンドに送信するためのラッパーメソッド。
ApiClientを使用して、バックエンドエンドポイントを呼び出す。
import 'package:clocky_app/api/api_client.dart';

class GoogleCalendarService {
  final ApiClient apiClient;
  GoogleCalendarService({required this.apiClient});

  // 認可コードをバックエンドに送信
  Future<void> sendAuthCode(String userId, String authCode) async {
    await apiClient.sendAuthCode(userId, authCode);
  }
}
ApiClient:アプリのバックエンド通信を統一的に管理するクラス
lib/api/api_client.dart
extension GoogleCalendarApi on ApiClient {
  Future<void> sendAuthCode(String userId, String authCode) async {
    final url = Uri.parse('$apiUrl/app/google-calendar/tokens');
    final headers = await apiHeaders();

    final body = {
      'userId': int.parse(userId),
      'authCode': authCode,
    };

    final response = await http.post(
      url,
      headers: headers,
      body: jsonEncode(body),
    );

    if (response.statusCode != 200) {
      throw Exception('Failed to send auth code: ${response.body}');
    }
  }
}
Go(バックエンド)の実装
バックエンドでは、認証コードをリフレッシュトークンに変換し、データベースに保存する。
GoogleCalendarTokenHandler:アプリケーションのHTTPエンドポイントを処理
- アプリケーションのHTTPエンドポイントを処理し、認証コードを受け取って、
GoogleCalendarTokenValidatorを使用してトークンを取得。 - トークンをデータベースに保存する高レベルのビジネスロジックを提供。
GoogleCalendarTokenValidatorをインジェクト(依存性注入)して使用する。
package http

import (
	"context"
	"net/http"
	"time"

	"log/slog"

	"github.com/EarEEG-dev/clocky_be/mia"
	"github.com/EarEEG-dev/clocky_be/mia/google"
	"github.com/labstack/echo/v4"
)


type GoogleCalendarTokenRequest struct {
	UserID   uint64 `json:"userId" validate:"required"`
	AuthCode string `json:"authCode" validate:"required"`
}


type GoogleCalendarTokenService interface {
	SaveToken(ctx context.Context, token mia.GoogleCalendarToken) error
	GetTokenByUserID(ctx context.Context, userID uint64) (mia.GoogleCalendarToken, error)
}


type GoogleCalendarTokenHandler struct {
	TokenValidator *google.GoogleCalendarTokenValidator
	TokenService   GoogleCalendarTokenService
}


func NewGoogleCalendarTokenHandler(
	tokenValidator *google.GoogleCalendarTokenValidator,
	tokenService GoogleCalendarTokenService,
) *GoogleCalendarTokenHandler {
	return &GoogleCalendarTokenHandler{
		TokenValidator: tokenValidator,
		TokenService:   tokenService,
	}
}

// 認証コードをリフレッシュトークンに交換しデータベースに保存
func (h *GoogleCalendarTokenHandler) HandleExchangeAuthCode(c echo.Context) error {
	var req GoogleCalendarTokenRequest
	if err := c.Bind(&req); err != nil {
		slog.Error("Failed to bind request", slog.Any("error", err))
		return c.JSON(http.StatusBadRequest, map[string]string{"error": "Invalid request payload"})
	}

	// リクエスト内容のデバッグログ
	slog.Info("Received request", "userID", req.UserID, "authCode", req.AuthCode)


	// リクエストのバリデーション
	if req.UserID == 0 || req.AuthCode == "" {
		return c.JSON(http.StatusBadRequest, map[string]string{"error": "userId and authCode are required"})
	}

	ctx := context.Background()

	// AuthCodeを使用してアクセストークンとリフレッシュトークンを取得
	token, err := h.TokenValidator.ExchangeAuthCode(ctx, req.AuthCode)
	if err != nil {
		slog.Error("Failed to exchange auth code", slog.Any("error", err))
		return c.JSON(http.StatusInternalServerError, map[string]string{"error": "Failed to exchange auth code"})
	}

	// トークン内容のデバッグログ
	slog.Info("Token exchanged successfully", "accessToken", token.AccessToken, "refreshToken", token.RefreshToken, "expiry", token.Expiry)


	// トークンデータを構築
	googleToken := mia.GoogleCalendarToken{
		UserID:       req.UserID,
		RefreshToken: token.RefreshToken,
		CreatedAt:    time.Now(),
		UpdatedAt:    time.Now(),
	}

	// トークンをデータベースに保存
	if err := h.TokenService.SaveToken(ctx, googleToken); err != nil {
		slog.Error("Failed to save Google Calendar token", slog.Any("error", err))
		return c.JSON(http.StatusInternalServerError, map[string]string{"error": "Failed to save token"})
	}

	return c.JSON(http.StatusOK, map[string]string{"message": "Token saved successfully"})
}
GoogleCalendarTokenValidator:認証コードをリフレッシュトークンに変更
GoogleCalendarTokenValidator は、OAuth 2.0 認証フローに基づいて認証コードをリフレッシュトークンに交換するロジックを提供するコンポーネント。
Google Service Accountでは、ユーザー固有のGoogleカレンダーへのアクセス権限を取得できないので、今回はユーザー固有のGoogleカレンダーにアクセスするためOAuth 2.0を使用する必要がある。
package google

import (
	"context"
	"errors"
	"fmt"
	"os"

	"golang.org/x/oauth2"
	"golang.org/x/oauth2/google"
	"google.golang.org/api/calendar/v3"
	"google.golang.org/api/option"
)

// GoogleCalendarTokenValidator は Google Calendar API のトークン操作を行う構造体
type GoogleCalendarTokenValidator struct {
	Service     *calendar.Service
	PackageName string
	Config      *oauth2.Config
}

// NewGoogleCalendarTokenValidator は Google Calendar API 用の Token Validator を初期化する
func NewGoogleCalendarTokenValidator() (*GoogleCalendarTokenValidator, error) {
	// 環境変数からOAuth 2.0クライアント情報を取得
	clientID := os.Getenv("GOOGLE_CLIENT_ID")
	clientSecret := os.Getenv("GOOGLE_CLIENT_SECRET")
	redirectURI := os.Getenv("GOOGLE_REDIRECT_URI")

	// 必須情報が不足している場合はエラー
	if clientID == "" || clientSecret == "" || redirectURI == "" {
		return nil, errors.New("missing required environment variables: GOOGLE_CLIENT_ID, GOOGLE_CLIENT_SECRET, GOOGLE_REDIRECT_URI")
	}

	// OAuth2 Config の初期化
	config := &oauth2.Config{
		ClientID:     clientID,
		ClientSecret: clientSecret,
		RedirectURL:  redirectURI,
		Scopes:       []string{calendar.CalendarScope},
		Endpoint:     google.Endpoint,
	}

	// Google Calendar Service の初期化
	ctx := context.Background()
	service, err := calendar.NewService(ctx, option.WithHTTPClient(config.Client(ctx, nil)))
	if err != nil {
		return nil, fmt.Errorf("failed to initialize Google Calendar service: %w", err)
	}

	// Validator の初期化
	return &GoogleCalendarTokenValidator{
		Service: service,
		Config:  config,
	}, nil
}

// ExchangeAuthCode は認証コードをアクセストークンおよびリフレッシュトークンに交換します
func (v *GoogleCalendarTokenValidator) ExchangeAuthCode(ctx context.Context, authCode string) (*oauth2.Token, error) {
	if v.Config == nil {
		return nil, errors.New("OAuth2 config is not initialized")
	}

	// 認証コードをアクセストークンに交換
	token, err := v.Config.Exchange(ctx, authCode)
	if err != nil {
		return nil, fmt.Errorf("failed to exchange auth code: %w", err)
	}

	return token, nil
}
OAuth 2.0クライアントIDを作成
Google Cloud Console → APIとサービス →認証情報→OAuth 2.0 クライアントID →Webアプリケーション
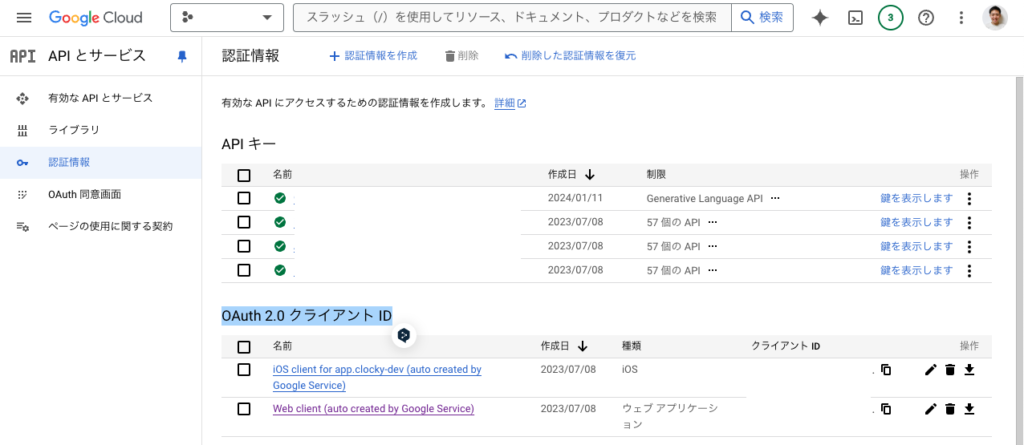
認証情報をJSON形式でダウンロードすると、下記のようなJSONを取得できる。
{
  "web": {
    "client_id": "YOUR_WEB_CLIENT_ID.apps.googleusercontent.com",
    "project_id": "your-project-id",
    "auth_uri": "https://accounts.google.com/o/oauth2/auth",
    "token_uri": "https://oauth2.googleapis.com/token",
    "auth_provider_x509_cert_url": "https://www.googleapis.com/oauth2/v1/certs",
    "client_secret": "YOUR_CLIENT_SECRET",
    "redirect_uris": ["https://your-app-url/callback"]
  }
}
Google OAuth 2.0では、アプリケーションがGoogle APIにアクセスするために以下のクライアント情報が必要
client_id: アプリケーションを識別するためのID。client_secret: アプリケーションの秘密情報で、認証コードをトークンに交換する際に使用。redirect_uri: 認証フロー完了後にユーザーをリダイレクトするURL(バックエンドでトークンを処理するエンドポイント)。
成功すれば、access_token と refresh_token が返される。
レスポンス例
{
  "access_token": "ya29.a0AfH6SMC...",
  "expires_in": 3599,
  "refresh_token": "1//0g5fDh...",
  "scope": "https://www.googleapis.com/auth/calendar",
  "token_type": "Bearer"
}
動作確認
Flutterアプリからカレンダー連携ボタンを押して、googleサインインを実行したのちに、カレンダーのアクセスを許可すると、サーバー側に下記のようにrefreshtokenが保存されたことを確認できた。

次は、このrefresh_tokenを用いてカレンダーの予定を取得して、テキストを音声に変換して、ミーア本体(ESP32)に送信する部分を開発する。
