Introduction.
Previously, in this article, we described the process of using Firebase Cloud Messaging (FCM) to send test transmissions in the background and foreground to the actual iOS device.
This time, we would like to implement a function to send push notifications from the server to FCM at regular times in the Go language.
The following four arguments are required to implement Push notifications in FCM
- FCM Server Key: Authorization of HTTP request header
- FCM token for the device: as a designation of the destination of the message
- Title.
- body (of letter)
Obtain FCM service account credentials
For API requests to FCM, the FCM server key was previously set as the Authorization in the HTTP request header, but this Cloud Messaging API (Legacy HTTP API) will be discontinued on June 20, 2024, and the FCM server However, this Cloud Messaging API (Legacy HTTP API) will be discontinued on June 20, 2024, and the FCM server key will no longer be available, so the HTTP v1 API must be used.
The HTTP v1 API is done via Oauth2.0 tokens, and FCM credentials (usually in JSON format) must be obtained from the Google Cloud console for OAuth2.0 token generation.
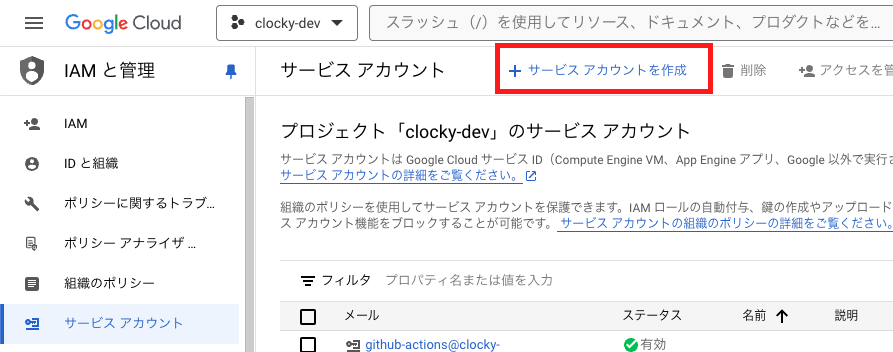
Click Google Cloud Console → IAM and Administration → Create Service Account
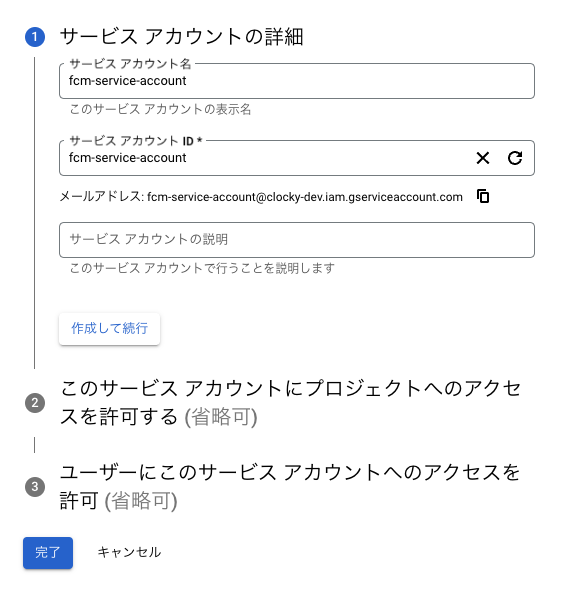
Fill out the required information and click Done.
- Service Account Name: Enter a descriptive name (e.g., FCM Service Account)
- Service Account ID: The same name is automatically populated when a service account name is entered, but can be customized as needed.
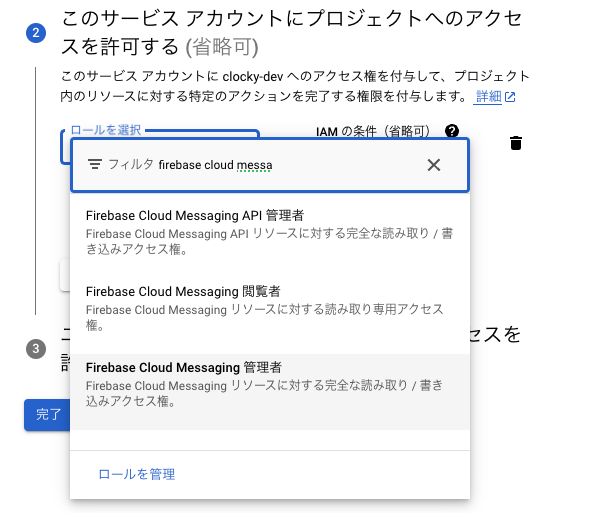
- Required Roles: Roles related to Firebase Cloud Messaging (e.g., “Firebase Cloud Messaging Admin”)
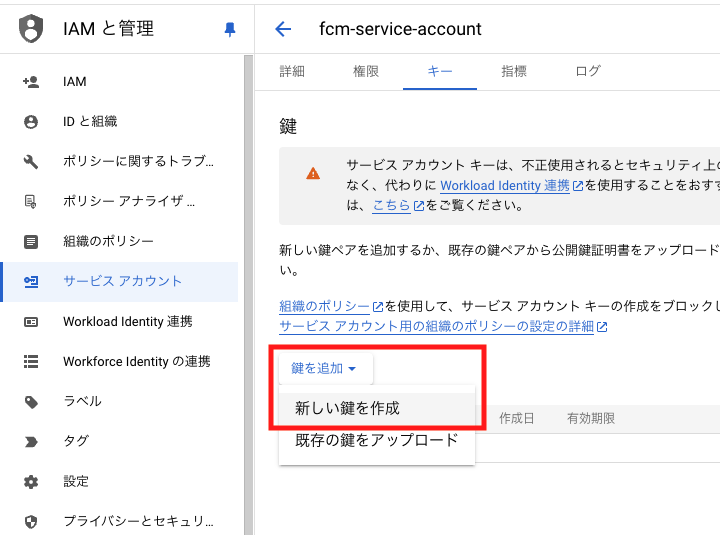
Select the created service account, click the “Key” tab, click “Add Key”, click “Create New Key”, select JSON format, and the download will start automatically.
Store the downloaded JSON file in an appropriate directory, such as in .credential, so that it can be called up.
Send FCM token to the server
When sending push notifications from the server to the FCM backend, the FCM token identifying the individual device must be passed as an argument.
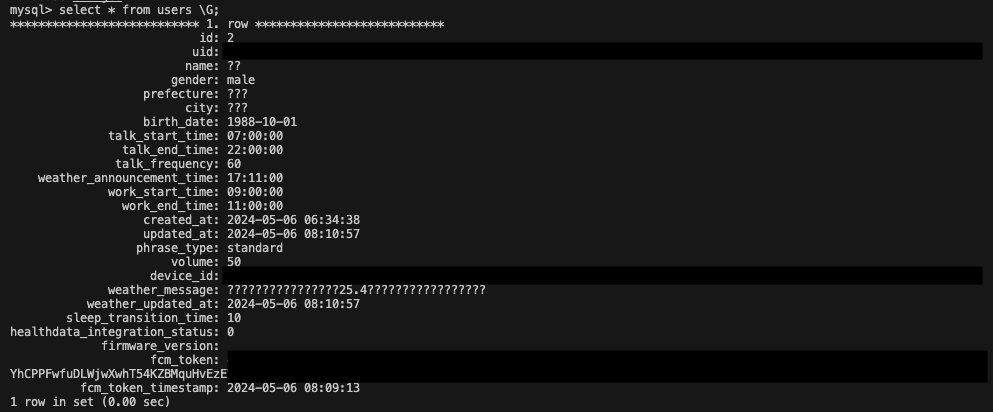
Add a new column called FCM token to the User table stored on the server, so that it is stored in the DB when the user starts the application for the first time, and implement the process of calling from the FCM token column in the DB when actually sending notifications.
According to the best practices for FCM registration token management, it is better to store the timestamp on the server along with the FCM token, so store the timestamp as well.
The app must obtain this token on first launch and store the token along with a timestamp on the app server. This timestamp is not provided by the FCM SDK and must be implemented by your own code and server.
Go: Add columns to store FCM tokens and timestamps in DB
$ cd scripts/migrations
$ migrate create -ext sql -format 2006010215 add_fcm_token_to_users
The up-and-down sql files are created and described as follows.
// 2024050323_add_fcm_token_to_users.up.sql
ALTER TABLE users
    ADD COLUMN fcm_token VARCHAR(255),
ADD COLUMN fcm_token_timestamp TIMESTAMP;// 2024050323_add_fcm_token_to_users.down.sql
ALTER TABLE users
DROP COLUMN fcm_token,
DROP COLUMN fcm_token_timestamp;I applied migration and added fcm_token and fcm_token_timestamp columns to the user table.
Go: Add fcm_token field to User structure
Add fcm_token field to Go’s User structure so that the fcm_token field can be read and written from the database.
// user.go
type User struct {
    UID                        string `db:"uid"`
    DeviceID                   string `db:"device_id"`
    Name                       string `db:"name"`
    // ... 他のフィールド
    FcmToken                   types.NullString `db:"fcm_token"`
    FcmTokenTimestamp          *time.Time      `db:"fcm_token_timestamp" json:"fcm_token_timestamp"`
}
Go: Update Update UpdateUser function to handle fcm_token.
// user_db.go
func UpdateUser(db *sqlx.DB, user *User) (*User, error) {
	tx, err := db.Beginx()
	if err != nil {
		return nil, err
	}

	query := `update users
			  set device_id				    = coalesce(:device_id, device_id),
			  ...
			  fcm_token = coalesce(:fcm_token, fcm_token),
			  fcm_token_timestamp		= coalesce(:fcm_token_timestamp, fcm_token_timestamp),
			  ...
			  WHERE uid = :uid;`
	return &updatedUser, nil
}
Flutter: Send FCM token to the server when the app starts
Treat FCM tokens as part of the user data and manage them in API requests using the ApiClient class.
Ensure that Dart’s User the model includes a field for FCM tokens and updates this model to allow serialization and deserialization of this field.
// lib/api/user.dart
class User {
  final String? uid;
  final String? fcmToken;
  final DateTime? fcmTokenTimestamp;

	User(
      {this.uid,
			 this.fcmToken,
       this.fcmTokenTimestamp});
}
Use build_runner to generate JSON serialization code (user.g.dart).
flutter pub run build_runner build --delete-conflicting-outputsNext, implement in main.dart The functionality is to retrieve the FCM token and send it to the server when the app is launched. updateUser method of UserNotifier already has the functionality to receive and update the User object, so we will use this method to update the user’s Update FCM token.
import 'package:clocky_app/api/user.dart';
import 'package:clocky_app/api/user_notifier.dart';
import 'package:firebase_core/firebase_core.dart';
import 'package:firebase_messaging/firebase_messaging.dart';
import 'package:flutter/material.dart';
import 'package:flutter_riverpod/flutter_riverpod.dart';
import 'package:overlay_support/overlay_support.dart';

void main() async {
  WidgetsFlutterBinding.ensureInitialized();
  await Firebase.initializeApp(options: DefaultFirebaseOptions.currentPlatform);
  runApp(ProviderScope(child: const ClockyApp()));
}

class ClockyApp extends ConsumerStatefulWidget {
  const ClockyApp({super.key});

  @override
  _ClockyAppState createState() => _ClockyAppState();
}

class _ClockyAppState extends ConsumerState<ClockyApp> {
  @override
  void initState() {
    super.initState();
    initializeApp();
  }

  Future<void> initializeApp() async {
    final messaging = FirebaseMessaging.instance;
    NotificationSettings settings = await messaging.requestPermission(
      alert: true,
      announcement: false,
      badge: true,
      carPlay: false,
      criticalAlert: false,
      provisional: false,
      sound: true,
    );
    debugPrint('User granted permission: ${settings.authorizationStatus}');

    final token = await messaging.getToken();
    debugPrint('FCM TOKEN: $token');

    if (token != null) {
    // FCMトークンをサーバーに送る
      final userNotifier = ref.read(userProvider.notifier);
      userNotifier.updateUser(User(fcmToken: token, fcmTokenTimestamp: DateTime.now()));
    }
  }
}
flutter run and verify that fcm_token and fcm_token_timestamp are correctly stored and updated in the DB.
In the flutter startup log, an updateUser request is sent to the server.
flutter: Request updateUser: {"fcm_token":"xxxxxxxxxxxxxxxxxxxxxxxxxxxxxx"}We confirmed that fcm_token and fcm_token_timestamp were successfully stored in the DB.
Go: Implement message notification function to FCM (HTTP v1 API supported)
Proceed with implementation (fcm.go) to send notifications from the server to FCM in the Go language.
This time, since the application is running on AWS instead of GCP, it corresponds to the ” case where the application is running on a server environment other than Google’s ” in the following explanation article.
Server endpoints for HTTP v1 are as follows
POST https://fcm.googleapis.com/v1/projects/myproject-b5ae1/messages:sendUse the OAuth 2.0 token obtained through the FCM service authentication information obtained earlier in the HTTP request header.
Use the google.golang.org/api/fcm/v1 package and use the WithCredentialsJSON method to read the JSON file of FCM service account credentials.
The SendFCMNotification function is used to send a notification to the FCM; it takes the FCM token, title, and message body as parameters and uses them to send a push notification.
The HTTP v1 API also changes the structure of the JSON message payload. To target a specific device, specify the device’s current registration token in the message objecttoken key.
  { "notification": {
      "body": "This is an FCM notification message!",
      "time": "FCM Message"
    },
    "to" : "bk3RNwTe3H0:CI2k_HHwgIpoDKCIZvvDMExUdFQ3P1..."
  }
The entire code is here.
package clocky_be

import (
	"context"
	"fmt"
	"log"

	fcm "google.golang.org/api/fcm/v1"
	"google.golang.org/api/option"
)


func SendFCMNotification(ctx context.Context, config *Config,token, title, body string) error {
	opt := option.WithCredentialsJSON([]byte(config.GoogleApplicationCredentials))
	service, err := fcm.NewService(ctx, opt)
	if err != nil {
		return fmt.Errorf("could not create FCM service: %v", err)
	}

	// Construct the message to be sent.
	message := &fcm.Message{
		Token: token,
		Notification: &fcm.Notification{
			Title: title,
			Body:  body,
		},
	}

	// Create a new "messages" client from the FCM service.
	messagesClient := fcm.NewProjectsMessagesService(service)

	request := &fcm.SendMessageRequest{
		Message: message,
	}
	fmt.Printf("FCM log")

	// Send the message using the FCM v1 API endpoint
	response, err := messagesClient.Send(fmt.Sprintf("projects/%s", config.FirebaseProjectId), request).Do()
	if err != nil {
		log.Printf("Request failed: %+v", request)
		return fmt.Errorf("failed to send notification: %v", err)
	}

	fmt.Printf("Successfully sent notification. Response: %+v\n", response)
	return nil
}
Function implementation to send weather information to FCM
Implement a function to send the weather information implemented this time to FCM using the SendFCMNotification function.
Add the FCM server key to the .env file.
FCM_SERVER_KEY=your_fcm_server_key_hereThis time, the weather information message to be pushed to the user is already stored in the weather_message column of the DB’s user table, so it is called from the WeatherMessage field of the User structure. The message title is fixed to “Today’s weather information.
// worker.go
// FCMを使用したリアルタイム天気通知の送信
func SendFCMWeatherNotification(ctx context.Context, db *sqlx.DB, message Message, config *Config) {
    user, err := GetUser(db, message.UserID)
    if err != nil {
        log.Printf("Failed to get user info for FCM notification: %v", err)
        return
    }

    // ユーザーのFCMトークンの存在を確認
    if !user.FcmToken.Valid {
        log.Printf("No FCM token available for user %s", user.UID)
        return
    }

    // 天気情報の更新が必要かどうかを確認
    if user.WeatherMessage.Valid && user.WeatherMessage.String != "" {
        // 天気情報をFCMで送信
        if err := SendFCMNotification(ctx, config, user.FcmToken.String, "[ミーア]今日の天気お知らせ", user.WeatherMessage.String); err != nil {
            log.Printf("Failed to send FCM notification for user %s: %v", user.UID, err)
            return
        }
        log.Printf("FCM notification sent for user: %s", user.UID)
    } else {
        log.Printf("No valid weather message to send for user %s", user.UID)
    }
}
Added periodic execution processing
Ensure that weather information is sent to the user via FCM at a specific time ( based on the WeatherAnnouncementTime stored in the database).
ScheduleTask function: Scheduling a task
clocky.ScheduleTask(db, messagesChan)retrieves from the database only those users whoseweather_announcement_timeexactly matches the current time and adds the FCM notification task to the queue.
// worker.go
func ScheduleTask(db *sqlx.DB, messagesChan chan Message) {
		var users []User
		query := `SELECT * FROM users WHERE DATE_FORMAT(weather_announcement_time, '%H:%i') = DATE_FORMAT(?, '%H:%i');`
		err = db.Select(&users, query, currentTimeJST.String())
    for _, user := range users {
			if user.WeatherAnnouncementTime.Valid {
				log.Printf("Sending FCM weather notification for user: %s", user.UID)
				message := Message{
					UserID: user.UID,
					Type:   "weather_fcm",
				}
				messagesChan <- message
			}
    }
    // ...
}
ProcessMessages function: Process messages
ProcessMessages(db, messagesChan, config)performs appropriate actions based on messages received from the message channel. This function processes different types of messages (FCM notifications of weather information and other processes)
// worker.go
// メッセージ処理の抽象化
func ProcessMessages(db *sqlx.DB, messagesChan chan Message, config *Config) {
    for message := range messagesChan {
        log.Printf("Processing message for user: %s, type: %s", message.UserID, message.Type)

        // タイムアウトを設定
        ctx, cancel := context.WithTimeout(context.Background(), 5*time.Minute)
        defer cancel()

        switch message.Type {
        case "weather_fcm":
            SendFCMWeatherNotification(ctx, db, message, config)
        default:
            log.Printf("Unknown message type: %s", message.Type)
        }
    }
}
Finally, set up the Cron job in main.go.
Go: Setup and start a Cron job
Initialize and schedule a Cron job: Create a Cron instance that supports second-by-second scheduling with cron.New and set it to run clocky.ScheduleTask at 0 seconds of every minute. This function schedules a recurring task (for example, updating a user’s weather information).
// main.go
package main

import (
	"context"
	"log"
	"github.com/jmoiron/sqlx"
	"github.com/robfig/cron/v3"
	"github.com/EarEEG-dev/clocky_be"
)

func main() {
	ctx := context.Background()
	config := clocky.NewConfig()

	db, err := sqlx.Open("mysql", config.DSN)
	if err != nil {
		log.Fatalf("unable to connect to database: %v", err)
	}

	if err := db.Ping(); err != nil {
		log.Fatalf("unable to ping database: %v", err)
	}
	log.Printf("connected to database")

	// メッセージチャネルとCronジョブの設定
	messagesChan := make(chan clocky.Message)

	// 秒単位をサポートしてcronを初期化
	c := cron.New(cron.WithSeconds())

	// 毎分0秒時点で起動
	c.AddFunc("0 * * * * *", func() {
		log.Println("Cron job triggered")
		clocky.ScheduleTask(db, messagesChan)
	})
	go c.Start()

	// 処理関数の起動数を増やして並列に処理させることも可能
	go clocky.ProcessMessages(db, messagesChan, config)

	// その他のアプリケーション初期化コード(HTTPサーバー、SQSリスナー、gRPCサーバー、Rest API)
	// ...
}
operation check
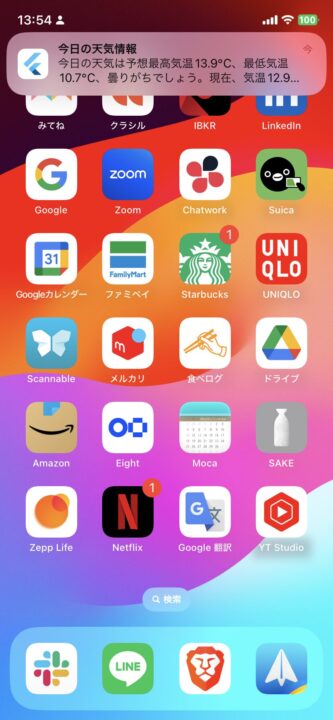
Verify whether the app receives a Push notification at the specified time by changing the weather notification time to 13:53 in the app.
The notification was received in the foreground.
Push notifications sent from the server to FCM are sent to the user’s device in real-time.

Next, change the notification time to 13:54 and put the app in the background state.
It arrived safely.
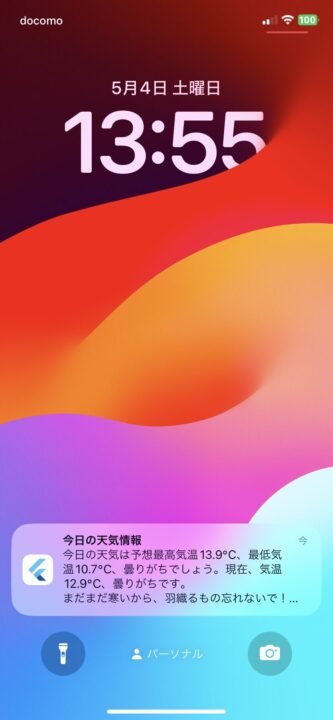
Finally, put it in a locked screen state. It arrived safely.

コメント