- Introduction.
- What is Gradle?
- Flutter project build.gradle file
- Changes in gradle description method since Flutter 3.16
- android/settings.gradle: Gradle configuration file
- Project-levelbuild.gradle(/project_root/android/build.gradle)
- App-levelbuild.gradle(/project_root/android/app/build.gradle)
- SDK version and API level settings (app level)
- gradle-wrapper.properties
- Clear Gradle build cache and rebuild
- When adding the flutter package
- Specify 10.0.2.2 for communication with the server on the local host
- Summary: Differences between iOS and Android settings
Introduction.
Currently developing “Mia,” a talking cat-shaped robot that speaks dialect.

So far, Mia’s apps have only been tested on the iOS simulator and the actual device, but of course we need to check them on the Android emulator as well.
As I was dealing with this, I started to wonder, “What is build.gradle anyway? So, let’s review the basics.
What is Gradle?
Gradle is a build automation system based on Groovy (or Kotlin). It is responsible for automating the development process, including software compilation, packaging, testing, and deployment.
Build scripts are written using a DSL (Domain Specific Language: a programming or specification language specific to a particular problem domain), allowing for a high degree of customization of the build process. packaging of applications, and more. The configuration is written in build.gradle.
In a Flutter app, the code written in Dart is compiled into native binaries; in a Flutter project, Gradle compiles the native parts, integrates various resources, resolves dependencies, etc. when generating the final application package (APK). and resolving dependencies when generating the final application package (APK).
The name “Gradle” is a combination of the words “gradual” and “build. In other words, Gradle means a build system that allows you to build step by step.
Flutter project build.gradle file
There are usually two build.gradle files in a Flutter project.
- Project level: Configure the entire Android application.
- App-level file: Configure the app module settings.
The hierarchical structure is as follows
└── MyApp/  # Project
    ├── gradle/
    │   └── wrapper/
    │       └── gradle-wrapper.properties
    ├── build.gradle(.kts)  #プロジェクトレベルのgradleファイル
    ├── settings.gradle(.kts)
    └── app/  # Module
        ├── build.gradle(.kts)  #アプリレベルのgradleファイル
        └── build/
            ├── libs/
            └── src/
                └── main/  # Source set
                    ├── java/
                    │   └── com.example.myapp
                    ├── res/
                    │   ├── drawable/
                    │   ├── values/
                    │   └── ...
                    └── AndroidManifest.xml
Changes in gradle description method since Flutter 3.16
Incidentally, there has been a major change in the way gradle files are described at the project and app levels since Flutter 3.16.
- In Flutter 3.16, support was added for applying these plugins using Gradle’s declarative plugins {} block (also known as the Plugin DSL), which is the recommended way to describe them.
- Android Gradle Plugin (AGP) and Kotlin version specification moved from
build.gradletosettings.gradle.
See below for details.

So, we will look at setting.gradle -> build.gradle (project) -> build.gradle (app) in that order.
android/settings.gradle: Gradle configuration file
This configuration file, located in the root project directory, defines the project-level repository settings and tells Gradle which modules to include when building the app.
Plugin Management (pluginManagement): Set the Flutter SDK path and the repository to use for your project (google(),mavenCentral(), etc.).- Plugin Definition
(plugins): Declaratively define required Gradle plugins (Flutter plugin, Android plugin, Kotlin plugin, etc.). Version control is also done here, andapply falseis specified to prevent automatic application. - Include module
(include ":app"): specifies the module to be built.
pluginManagement {
    def flutterSdkPath = {
        def properties = new Properties()
        file("local.properties").withInputStream { properties.load(it) }
        def flutterSdkPath = properties.getProperty("flutter.sdk")
        assert flutterSdkPath != null, "flutter.sdk not set in local.properties"
        return flutterSdkPath
    }()

    includeBuild("$flutterSdkPath/packages/flutter_tools/gradle")

    repositories {
        google()
        mavenCentral()
        gradlePluginPortal()
    }
}

plugins {
    id "dev.flutter.flutter-plugin-loader" version "1.0.0"
    id "com.android.application" version "7.4.2" apply false
    id "org.jetbrains.kotlin.android" version "1.9.20" apply false
    id "com.google.gms.google-services" version "4.3.14" apply false
}

include ":app"
Project-levelbuild.gradle(/project_root/android/build.gradle)
Define build settings for the entire project.
- Repository Definition
(allprojects { repositories { ...} }): Define a common repository for all projects. - clean task
(tasks.register("clean", Delete) { ...}): Define acleantask and delete the project build directory. - AGP and Kotlin version definitions were removed and these were moved to
settings.gradle.
// /project_root/android/build.gradle
allprojects {
    repositories {
        google()
        mavenCentral()
    }
}

rootProject.buildDir = '../build'
subprojects {
    project.buildDir = "${rootProject.buildDir}/${project.name}"
}
subprojects {
    project.evaluationDependsOn(':app')
}

tasks.register("clean", Delete) {
    delete rootProject.buildDir
}
App-levelbuild.gradle(/project_root/android/app/build.gradle)
Manage settings for a specific application module (usually the Flutter app itself).
Main Responsibilities
- Apply plugins
(plugins { ...}): Declaratively apply the required plugins. This is where the plugin is actually activated. - App-specific settings
(android { ...}): App-specific settings such as SDK version, target version, dependencies, etc. - Dependency management
(dependencies { ...}): Manage required dependency libraries at the app level.
plugins {
    id 'com.android.application'
    id 'com.google.gms.google-services'
    id 'kotlin-android'
    id "dev.flutter.flutter-gradle-plugin"
}


android {
    compileSdkVersion 34 // コンパイルに使用するSDKバージョン
    ndkVersion flutter.ndkVersion

    compileOptions {
        sourceCompatibility JavaVersion.VERSION_1_8
        targetCompatibility JavaVersion.VERSION_1_8
    }

    kotlinOptions {
        jvmTarget = '1.8'
    }

    sourceSets {
        main.java.srcDirs += 'src/main/kotlin'
    }

    defaultConfig {
        applicationId "${dartDefines.appId}" //アプリの一意の識別子。Google Playストアなどのアプリストアでアプリを一意に識別するために使用される
        minSdkVersion 26 // サポートする最小のAndroidバージョン
        targetSdkVersion flutter.targetSdkVersion // アプリが最適化されていると想定するAndroidバージョン
        versionCode flutterVersionCode.toInteger()
        versionName flutterVersionName
        resValue "string", "app_name", "${dartDefines.appName}"
        archivesBaseName "${dartDefines.flavor}-${flutterVersionName}"
    }

    signingConfigs {
        release {
            keyAlias keystoreProperties['keyAlias']
            keyPassword keystoreProperties['keyPassword']
            storeFile keystoreProperties['storeFile'] ? file(keystoreProperties['storeFile']) : null
            storePassword keystoreProperties['storePassword']
        }
    }

    buildTypes {
        release {
            signingConfig signingConfigs.release
        }
    }
}

flutter {
    source '../..'
}
We will take a closer look at the app-specific settings (SDK version, target version, dependencies, etc.) described in this app-level build.gradle file name.
SDK version and API level settings (app level)
- Since the SDK version and API level settings are done on an app-by-app basis, these settings should be described in the
app/build.gradlefile. compileSdkVersion: API level used at compile time. This determines the Android API and Java API that can be used when compiling the source code. To use the latest Android features, use the latest Android SDK at compile time.minSdkVersion: Minimum Android version (API level) at which the app can be installed. This value can be set to limit the app so that it cannot even be installed on devices with older versions.targetSdkVersion: specifies the target Android version (API level) for which the app is being optimized and tested. compileSdkVersion defines the maximum set of APIs available to the app, so targetSdkVersion must be less than or equal to it.targetSdkshould be specified undercompileSdk.
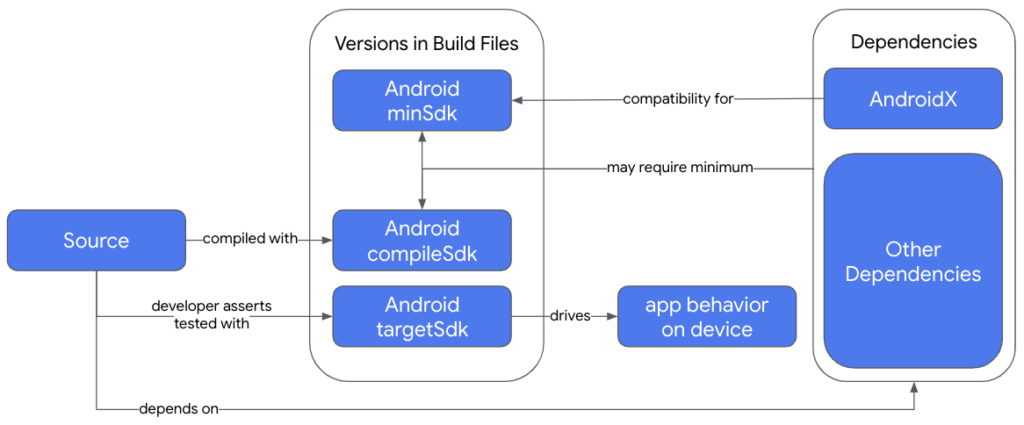
For Flutter, it is common to specify compileSdkVersion as flutter.compileSdkVersion so that it is dynamically set to the version provided by the Flutter SDK.
 defaultConfig {
        // TODO: Specify your own unique Application ID (https://developer.android.com/studio/build/application-id.html).
        applicationId "com.example.myapp"
        // You can update the following values to match your application needs.
        // For more information, see: https://docs.flutter.dev/deployment/android#reviewing-the-build-configuration.
        minSdkVersion 26
        targetSdkVersion flutter.targetSdkVersion
        versionCode flutterVersionCode.toInteger()
        versionName flutterVersionName
    }
In this case, to check the value of targetSdkVersion, perform the following steps.
Check flutter.sdk value in local.properties file
Open the local.properties file under project_root/android and check the value of flutter.sdk. This points to the directory where the Flutter SDK is installed.

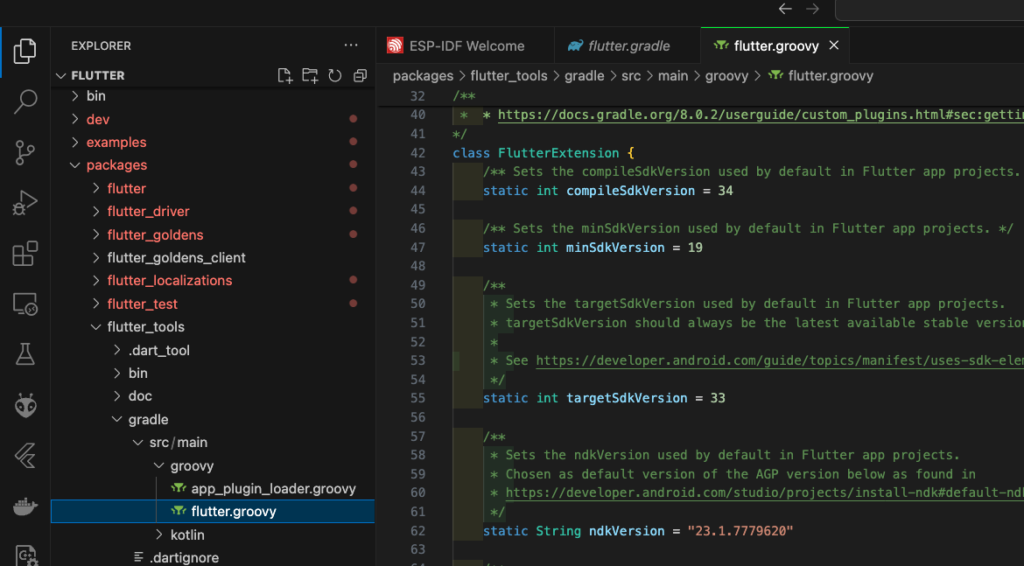
Open theflutter.groovyfile in the Flutter SDK
Open /usr/local/Caskroom/flutter/3.7.12/flutter/packages/flutter_tools/gradle/src/main/groovy/flutter.groovy.
- compileSdkVersion = 34
- targetSdk Version = 33
was found to be set.
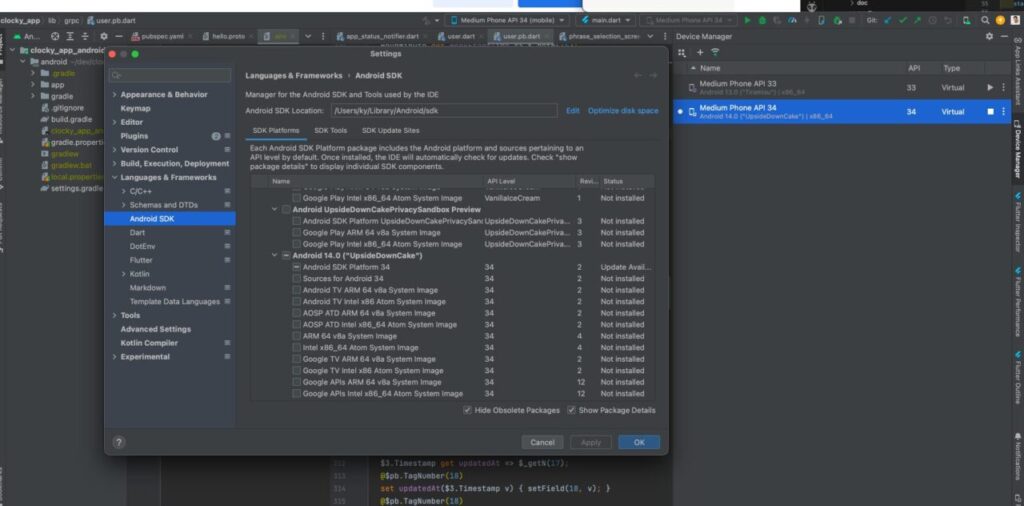
Incidentally, although this is not the purpose of this article, to install an emulator that corresponds to the API level set in compileSdkVersion,
In Android Studio, click on the Tools tab -> SDK Manager, select the “SDK Platforms” tab, and select the corresponding API level (in this case, API34). Then click on the Device Manager icon in the upper right corner of the screen to add an emulator.
gradle-wrapper.properties
This file contains settings related to the Gradle Wrapper and specifies the version of Gradle to be used to build the project. The Gradle Wrapper automatically downloads the specified version of Gradle and builds the project, even if the developer does not have Gradle installed on his machine.
Example configuration in the gradle-wrapper.properties file.
distributionUrlspecifies the Gradle version and type (bin or all) to download.- Other parameters define where and how downloaded files are stored.
// /project_root/android/gradle/wrapper/gradle-wrapper.properties
distributionBase=GRADLE_USER_HOME
distributionPath=wrapper/dists
distributionUrl=https\://services.gradle.org/distributions/gradle-8.0-bin.zip
zipStoreBase=GRADLE_USER_HOME
zipStorePath=wrapper/dists
Gradle version and Java, Kotlin compatibility here
https://docs.gradle.org/current/userguide/compatibility.html
Clear Gradle build cache and rebuild
If an error occurs when building with the Android emulator and the error noted is not a problem in the code, it may be a build cache issue.
Rebuild the project after caching the gradle build in the your-flutter-project/android/ directory.
./gradlew clean
./gradlew build

# つなげて記載も可能
./gradlew clean build
If you want to see error details, etc. at build time, add the following options.
--stacktraceor-S: Display a stack trace to determine the cause of the error--infoor-i: Provides detailed information about the build process--debug: Provides more detailed debugging information
When adding the flutter package
If you want to add some new feature to your Flutter app, first read the package readme carefully.
For example, if you want to operate an application in the background, you want to introduce a flutter package called flutter_background_service.

First, if you read the Readme, the following is listed as a Warning for Android.
WARNING:

Please make sure your project already use the version of gradle tools below:

in android/build.gradle classpath 'com.android.tools.build:gradle:7.4.2'
in android/build.gradle ext.kotlin_version = '1.8.10'
in android/gradle/wrapper/gradle-wrapper.properties distributionUrl=https://services.gradle.org/distributions/gradle-7.5-all.zip
When using the flutter_background_service package, if you develop without the recommended settings for compatibility, when you actually check the operation, you may find yourself saying, “Oh, it doesn’t work! Why?” and you will end up spending a lot of time trying to determine the cause.
Specify 10.0.2.2 for communication with the server on the local host
When using the Android emulator to communicate with a server running on the local host, the normal localhost address (127.0.0.1) cannot be used. This is because the environment in which the emulator is executed is different from that of the host machine.
Specifying 10.0.2.2 allows the emulator to connect to servers running on the host machine (API server, database server, etc.).
For example, if an API server is running on the 8080 port on the host machine, the URL to connect to this API server from an application on the emulator is as follows. This IP address is only for the Android emulator, and different settings are required for testing on the actual Android machine.
API_URL=http://10.0.2.2:8080Summary: Differences between iOS and Android settings
Android Build Settings
As we have seen, the build.gra dle file plays a central role in Android app development .build.gradle file uses a DSL (domain-specific language), which allows developers to finely control the app build process through this script.
iOS Build Settings
In the iOS development environment, on the other hand, there is no direct file equivalent to build.gradle.
The build settings for iOS apps are mainly done through the Xcode GUI; the .pbxproj file in the Xcode project contains build setting information, but this file is in Xcode’s own format and manual editing is not recommended.
So, iOS requires familiarity with the Xcode GUI and limits flexibility in customizing the build process compared to a script-based approach like Android.


コメント