
- Introduction.
- Selecting Hosting Services with MongoDB Atlas
- MongoDB Atlas Cluster Creation and Setup Instructions
- Selecting a MongoDB Connection Method
- Obtaining the MongoDB connection URI
- Connection setup from the backend: using Cloud Run
- Update backend code
- MongoDB Compass Installation and Data Verification
- Actual operation check and test procedure using Postman
- summary
Introduction.
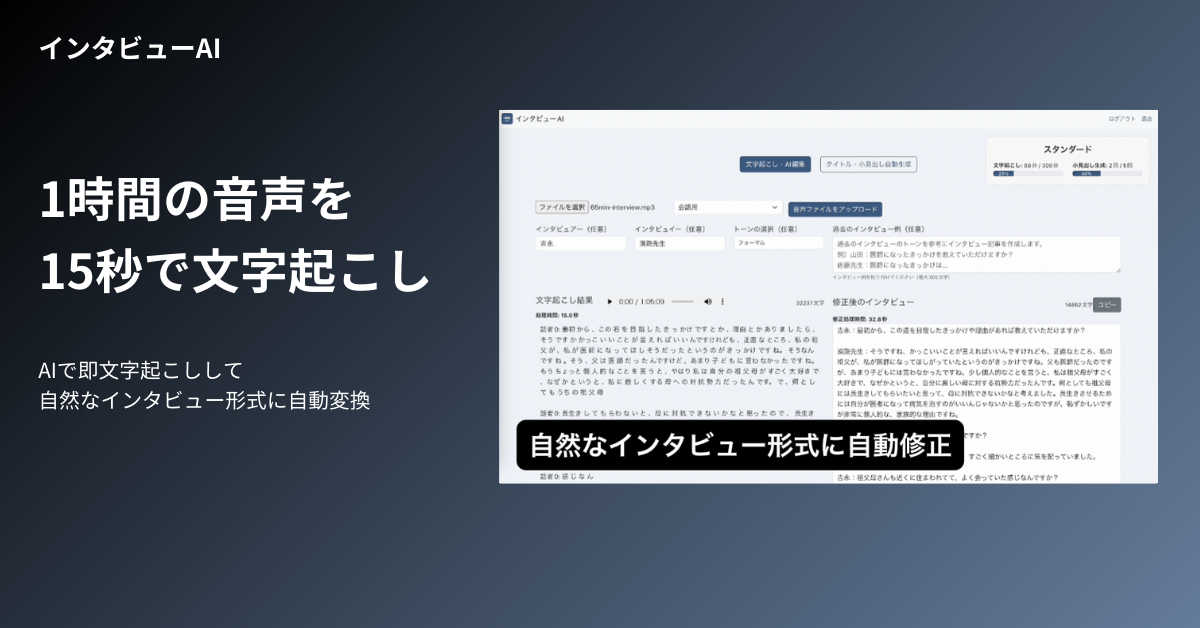
Currently developing a personal “Interview AI” that can transcribe an hour’s worth of audio in 15 seconds and automatically convert it into a natural conversational format.
Currently, we have almost finished development in the development environment and are in the process of migrating to the production environment.
The front end is developed with React, the back end with Node.js, and the database with MongoDB.
MongoDB Atlas was used to set up the backend connection settings in Cloud Run from hosting the database in the production environment. This article describes the steps to create the cluster, how to securely set the connection URI, manage the secret using Secret Manager, and even how to verify the database using MongoDB Compass.
Selecting Hosting Services with MongoDB Atlas
Since MongoDB in the local environment is not directly accessible from Cloud Run, the following services should be selected to host MongoDB.
- MongoDB Atlas: Cloud-based MongoDB hosting service for easy deployment.
- Self Hosting: Host MongoDB using Google Cloud’s Compute Engine or other cloud providers.
I think I will choose MongoDB Atlas for this project.
MongoDB Atlas Cluster Creation and Setup Instructions
Go to MongoDB Atlas and create an account.
When you create an account, you are automatically taken to the cluster creation screen.
At the time of production release, M10 would be better, but once we want to see if the DB works in the production environment, we choose M0 (Free Tier: free plan).
The cluster name (which cannot be changed later) should be the same as the service name, INTERVIEW-AI. For the provider, select Google Cloud since GCP is used this time.
Click the “Create Deployment” button and wait until the cluster provisioning is complete.

Selecting a MongoDB Connection Method
Go to the connection method selection screen when creating a MongoDB cluster.
This time, select “Drivers” because you need to use MongoDB drivers to connect to MongoDB from a backend application (e.g. Node.js).

Obtaining the MongoDB connection URI
Install the MongoDB driver by running npm install mongodb in the backend/ directory as described in the next screen. After successful installation, confirm that mongodb has been added to the dependencies section of package.json.
Copy the connection URI used to connect to MongoDB Atlas from your Node.js application in the ” Add your connection string into your application code ” section.

Connection setup from the backend: using Cloud Run
Set the connection URI copied earlier as the Cloud Run environment variable MONGODB_URI.
Use Secret Manager to manage the security of connection URIs. You can create a secret with the following command.
echo -n "MongoDB接続URI" | gcloud secrets create MONGODB_URI --data-file=-When deploying to Cloud Run, set the secret you created as an environment variable. Execute the command as follows.
gcloud run deploy backend-service
  --image gcr.io/[project-id]/backend
  --platform managed
  --region asia-northeast1
  --allow-unauthenticated
  --set-secrets MONGODB_URI=projects/[project-number]/secrets/MONGODB_URI:latest
  --service-account=service-account@[project-id].iam.gserviceaccount.com
If the deployment is successful, the service URL of the published backend is displayed.

Confirm that the configured MONGODB_URI has been added to the “Variables and Secrets” tab of Cloud Run’s container edit.

Update backend code
Implement the code necessary to connect to MongoDB Atlas. Get the connection URI from the environment variable.
const mongoose = require('mongoose');

// MongoDB接続
const uri = process.env.MONGODB_URI;

mongoose.connect(uri, { useNewUrlParser: true, useUnifiedTopology: true })
    .then(() => console.log('MongoDB connected'))
    .catch(err => console.error('MongoDB connection error:', err));
Using this method, the MongoDB connection URI can be securely managed by Secret Manager and sensitive information can be set as an environment variable when deploying to Cloud Run.
MongoDB Compass Installation and Data Verification
After creating a MongoDB cluster, the following top screen will appear. Use MongoDB Compass to easily check the database with GUI.
Click on “Connect,” then on Compass.


Then, the following screen will appear and MongoDB Compass will be installed

After installation is complete, start MongoDB Compass and copy the connection string obtained from MongoDB Atlas. The name is arbitrary, but in this case I chose prd-interview-ai.

Then, the connection was made successfully and the collection was displayed as shown below. This time, the sample data is displayed by default because the sample data was checked when the cluster was created.

Actual operation check and test procedure using Postman
Verify that the backend deployed in Cloud Run can connect to MongoDB Atlas and test the behavior by making API requests.
In this case, we will test the connection to MongoDB by calling the backend API directly from Visual Studio Code using Postman.
Click on the “New” button in the upper left corner of Postman and select “Request”.
Select POST in HTTP Method and enter the URL of the backend deployed in Cloud Run in URL.
Select the “Body” tab, choose “raw,” set the data format to JSON, enter the following JSON as a new user registration, and click “Send.

The response message indicated that the user was successfully saved, and we could confirm that the user we created was also successfully saved in the users collection in MongoDB Compass.

summary
This article describes the process of hosting the database in a production environment using MongoDB Atlas and integrating it with Google Cloud Run.
A cluster was created in MongoDB Atlas and Google Cloud Secret Manager was used to securely manage connection URIs. We also utilized MongoDB Compass to verify data and test actual API connections to verify the data storage flow in the production environment separately from the front end.

