
Developing “Mia,” a talking cat-shaped robot that speaks various dialects.

In the last issue, we finished calling data on the ESP32 board using LittleFS and Sqlite3.
Difference between ArduinoIDE and PlatformIO
I knew PlatformIO existed, but I only thought it was a separate IDE from Arduino and didn’t pay attention to it. I was developing with the Arduino IDE and thought it was inconvenient because Build was slow and I couldn’t split the code screen, but with Arduino I was writing code.
Recently, I have been writing code in VSCode and executing it in Arduino IDE.
However, I found that there are various inconveniences with Arduino in setting up the partition table (to be described in another article), and after reading an article about how PlatformIO is easier because you only need to write in the configuration file, I decided that it would be better to move to PlatformIO. I decided it was better to move to PlatformIO.
I had already written a lot of code on Arduino, but I decided to migrate to PlatformIO. To be honest, I thought I should have written the code in PlatformIO from the beginning, but I was a wimp.
For a comparison of Platform and Arduino, see the following article and others

Migration from Arduino to PlatformIO
Now, with reference to the following article, start the migration

Create a project in PlatformIO
Assumption that you are using VSCode as a code editor.
Install PlatformIO IDE as an extension of VSCode, referring to the following URL

After installation, create a new project in PlatformIO
In this case, the name, board, and framework are specified below. The name is optional. Board is the name of the board you are using.

Click the Finish button to display the newly created project under the Documents→PlatformIO→Projects folder.

The contents of the settings (borad, framework) are listed in the configuration file platorm.ini

Copy the source under the src directory
In the case of platformIO, a src folder is automatically created under the root directory of the project name, so put all the code created with ArduinoIDE in this folder.

Library Deployment
I will try to Build in this state just to see if it works.
There is a check button at the bottom of the VSCode editor, which is the Build icon. Click here.

Naturally, it comes up with so many errors. At this point, 61 errors appear.

The above error is pissing me off because “ESP32Serov library is not included”.
-> Sure, because I haven’t defined any libraries to install in platform.ini yet.
Kindly tell me, are you looking for ESP32Servo.h?
If you are looking for platform IO, this is the library with a link, so click on the URL part of web>URL

Go to a screen like this.

This library attempts to faithfully replicate the semantics of the Arduino Servo library (see http://www.arduino.cc/en/Reference/Servo) for the ESP This library attempts to faithfully replicate the semantics of the Arduino Servo library (see ) for the ESP32, with two (optional) additions.
→Install this library as it perfectly complements the Arduino Servo motor library for the ESP 32, with two (optional additions).
Click on the Installation tab.

The lib_deps section of platform.ini says to list the library.
lib_deps section
A section that defines the dependencies of the libraries used in a project.
Abbreviation for library dependencies
Official site

So, put lib_deps= in the platformio.ini file and paste the library that was listed in the installation earlier.
The number of errors was reduced from 61 to 56.
In the terminal, click on the URL in the error message Web > URL due to the library not being included.
→Click Installation on the site that opens.
→Copy the library that should be pasted into the lib_deps section and copy it into the lib_deps section of the platformio.ini file.
→The library will be installed automatically. When it is done, press “upload” to confirm that the library no longer has the relevant error.
Repeat this process to install the necessary libraries.
Correction of file extension INO
Once the library is in, the next step is to fix the extension INO file and squash any other errors.
Changed the file extension from .ino to .cpp (because .ino is not supported by PlatformIO).
Add #include at the top of the .cpp file (VSCode+PlatformIO needs to explicitly include Arduino.h)
Also, at the time of arduino IDE, there were multiple .ino files, so just changing the extension to cpp file as it was caused a lot of undefined errors for variables and functions.
If you have defined functions after the loop function (.ino files can execute code independent of the order of functions), you will get an undefined error if you try to call the corresponding function in the loop function, so you should put all the individual functions before the setup () function first to avoid the error and to be able to build for now.
There is a way to add a function prototype so that individual functions defined after the loop function will also be loaded correctly, but we will put that off for now.
Build→Upload
Press Build at the bottom of the VSCode editor screen, followed by Upload to reflect the program on the ESP32 board.
In the case of Arduino IDE, it was necessary to select each port from the tab menu, but in the case of PlatformIO, the port is automatically detected, so there is no need to select the port, which is nice.

Not working -> Upload data to LittleFS
I thought that this should resolve the error and it should work fine, but for some reason it does not.
When I opened the Serial monitor, I got the following error message.
sqlite3 is not recognized as a DB.

I realized that I had not yet uploaded the data to LittleFS in PlatformIO, and since the DB is also uploaded to LittleFS for access, it is true that an error will occur when I run an SQL query since there is no DB to begin with.
So I asked chat-gpt how to do it.
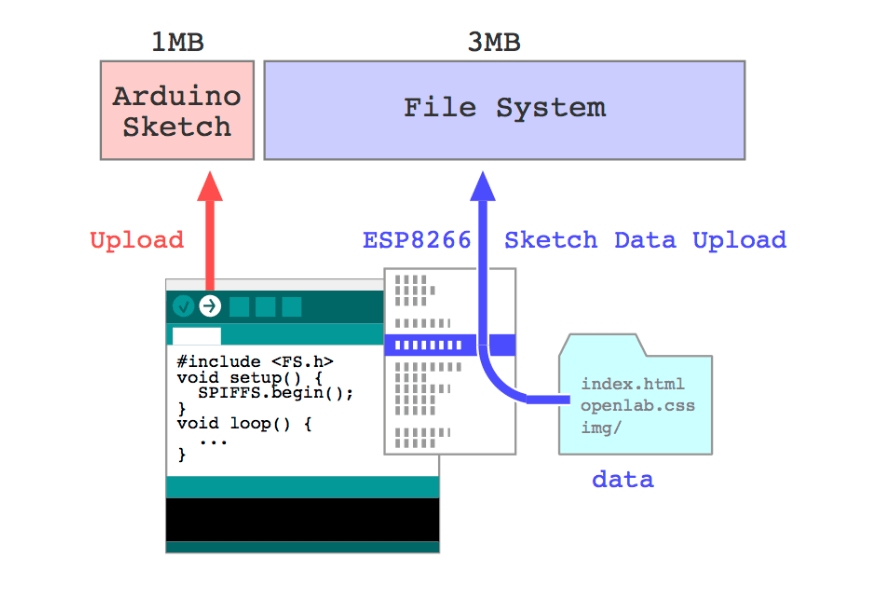
Uploading data to SPIFFS or LittleFS in PlatformIO is not as intuitive as in the Arduino IDE and the setup and procedure is a bit different. Below are the general steps for uploading data to LittleFS in PlatformIO.
- First, the data files are placed in a specific directory in the project; in the Arduino IDE, this is usuallythedatadirectory at the same level as the main **.inofile; in PlatformIO, the data** directory is used as well in the default configuration. In PlatformIO, the data** directory is used as well in the default configuration.
Open the **platformio.ini configuration file and set board_build. filesystem to littlefs**. This will use LittleFS as the file system.
Polylang placeholder do not modify
Then, execute the following commands in the PlatformIO terminal or CLI
Polylang placeholder do not modify
This command will build the files in the **data** directory in LittleFS format and upload the resulting image to the ESP32 or other device.
However, as with the Arduino IDE, this procedure assumes that the board supports SPIFFS or LittleFS and has sufficient storage space.
Define the littlefs file system in platform.ini as you were told,
pio run -t uploadfswas run in the terminal, but an error occurred.
Change data directory
The reason is that all the code that was created during the Ardiuno ide was transferred to the src directory of platform io, so the data directory was changed to root→src→data. It is necessary to change it back to root→data.

Again, run the following command to upload the data to the file system. This time it was done.
pio run -t uploadfsCompleted (but another problem surfaced)
Now, the Upload error is gone and the site is working, but another problem has surfaced: the eye images are flickering as shown below.
This issue will be addressed in the future.

However, I am glad that I made the transition because now I can use VSCode to centralize all code creation, Build, and Upload, and I feel that the Build speed is about twice as fast as it was with Arduino.


コメント