
Introduction
We are currently developing a talking cat-like robot called “Mia” that speaks dialects.
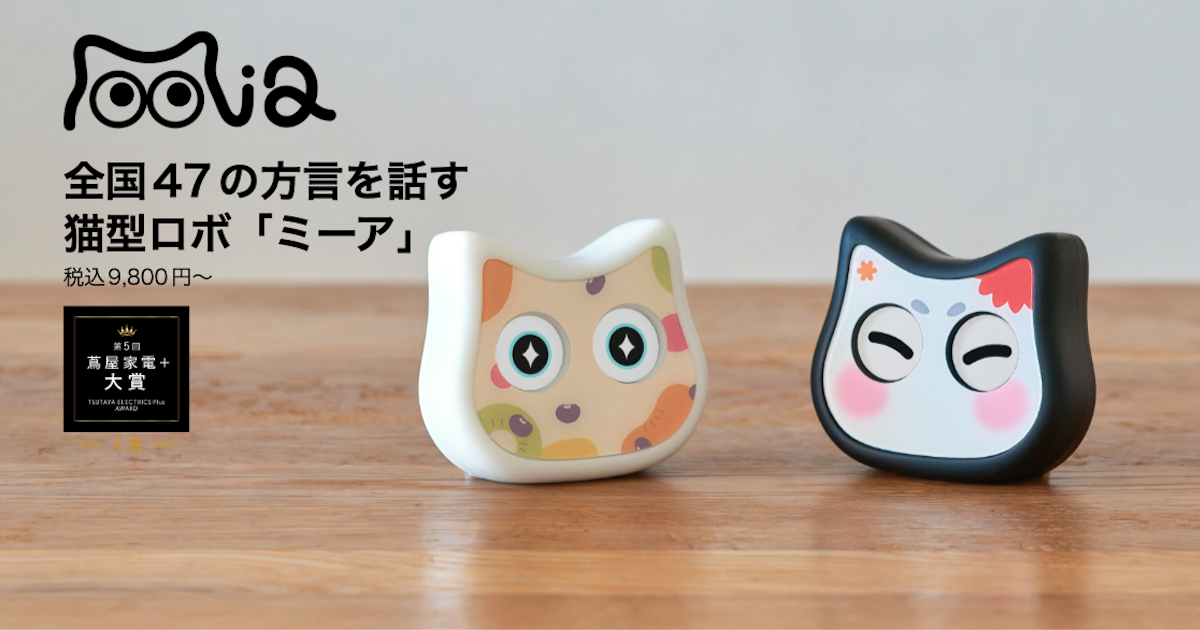
We are also developing an app that will allow you to switch dialects and personalities, as well as change speaking time settings, by connecting Mia’s main body and the app via Wi-Fi.
In preparation for release on June 1, 2024, it will soon be necessary to submit the app to the Apple Store and Google Play, so we have written a memo on how to post screens and text for the app release.
Items required to create an iOS product page
Click here for the items required to create an iOS product page and an explanation of each item (Apple official)
- app name
- icon
- Subtitle: within 30 characters
- App Preview: A short video shown to users on the App Store. within 30 seconds
- screenshot
- Overview: Introduction to app functions and features
- promotional text
- In-app purchases, new features, ratings and reviews, categories, localization
Create iOS previews and screenshots
Requirement: Prepare at least one screenshot with the highest resolution
The iOS preview and screenshot section of the app application is as shown below.

Click here for Apple’s guidelines for app previews and screenshots

Recommended app preview and screenshot sizes are determined by iPhone display size. However, you don’t need to provide images for every iPhone display size, and if your app’s UI is the same across multiple device sizes and localizations, you only need to provide the highest-resolution screenshots you need. The highest resolution screenshot provided will automatically cascade down and adapt to other device sizes.
In other words, all you need to do this time is create an image for the iPhone 6.7-inch display. Requires 1290×2796px.
You must also post at least one screenshot, and you can upload up to 10 screenshots.
Try grid posting (split posting)
This time, I decided to try a grid post (split post) as a screenshot of the app, rather than the usual one-page screenshot of the app and an explanation of its functions.
Click here for common screenshots and explanations (e.g. LINE)

Grid posts are “posts where multiple images on the home screen are divided into one large photo” that you often see on Instagram. For example, companies like Uber and Spotify use grid posts for app screenshots on the App Store.
In both cases, not all posts are grid posts, but only the first two posts are grid posts.


This time, I would like to follow this example and make a grid post introducing Mia’s app.
Prepare a frame for grid posting with Figma
In Figma, we will describe the design of the screenshot of the app, so we will prepare a frame for grid posting. This time, we plan to post 4 screenshots.
Therefore, we prepared a frame with a width of 1290px × 4 = 5160px for a height of 2796px. Then, use the created frame as a guide to divide it into sections of 1290px. It was created as follows.

Also, include a screenshot of the app introduction.
In this way, I made the first two photos into a grid post format, interspersed with Mia with various facial expressions and various personalities and dialect patterns.

Once created, you will need to export 4 images to actually post as iOS screenshots, with the frame size set to 1290px in width.
Use online image segmentation tools
There was an online image segmentation tool called Utility-labo, so I used it.
If you specify 4 divisions only in the horizontal direction and run it, it will be divided into 4 parts neatly, so download all the files.


Then, upload the four generated images to an iOS screenshot.
It was successfully uploaded as shown below.
It would have been better if the screen of the first smartphone was moved a little further to the left.

Promotional text/summary/keywords
Next, enter the text part.
- Promotional text : Concisely introduce your app’s salient features and latest updates in 170 characters or less. You can update your promotional text at any time without submitting a new version of your app. Introducing the latest news about the app, including limited-time sales and upcoming features.
- Summary : A section that can contain up to 4,000 characters and provides a detailed description of the app. This section explains in detail the app’s features, how to use it, and its main benefits, and encourages users to download it.
- Keywords : Enter relevant keywords to help your app rank higher in searches. Keywords must be separated by commas with no spaces and have a total of 100 characters. Specify keywords by considering the words and phrases that users who are looking for the same type of app are likely to enter.

This time, the overview is as follows.
The “Mia” app is an app that allows you to configure conversation settings for the talking cat robot “Mia”.
The talking cat robot “Mia” shares sadness and joy with over 100 different facial expressions.They speak a variety of personalities (sarcastic, nosy, romantic, natural) and dialects (Osaka dialect, Hakata dialect, Kagoshima dialect, Hiroshima dialect).Would you like to make your daily life more enjoyable by living with Mia?
■Main functions of the “Mia” app
・Connection settings: You can connect to Mia and establish a Wi-Fi connection.
・Conversation settings: You can change Mia’s personality type and dialect. You can also set the speaking time and frequency.
There are still some items to fill in when creating the product page, so let’s proceed with filling in the remaining items.

